This is a simple solution of how to adapt one of MS List Templates to your needs.
It is set up as an example for expenses approval, but can be implemented as Purchase Orders approvals, Budget / Fund spent request on Team level or in HR for new job role authorisation , or changes to the salary.
you name it!
It will suit a small company / small team who needs a quick solution at little cost or effort.
Remember, 3rd party solutions, specifically design are always a better choice, as they know what they are doing, and providing the service and support. Here you reply on yourself as a creator.
So let's start.
We are using
- SharePoint as our environment
- Microsoft Lists as our data source.
- Approvals for our approval flow
- Teams and SharePoint Site/Page as User Interface.

Step 1: Create new list from Travel requests with approval Template. Save as Approvals Template
Rename Trip title to Title (Column Settings -> Edit)
Delete the following columns:
- Reason for travel
- Destination
- Travel start date
- Travel end date
- Travel duration (days)
- Airline
- Estimated airfare
- Hotel
- Estimated hotel cost
Delete either from List (Column Settings -> Edit-> Delete)
Or from List settings page (Settings cog->List settings)
SharePoint -> Home-> New-> List-> Create from other List
These three lists will play role of "dimension tables" to create a dynamic dropdown lists Categories, Funds, Departments for our "factor table" Expenses with Approvals
Create Blank List Categories
Add Columns:
- Code (Text)
- Status (Choice Active / Closed)
- Name (Calculated column ) See all column types.
Formula (IF([Status]="Active",[Title]."")
Create two other lists using Categories as a template
Note ! it the video I did not use Name for the calculated column, instead I called it same as the the List. Category, Fund, Department.
I mentioned in the video, that it is a bad idea to just rename column, as the name though visually seems different on the, SharePoint keeps it's original name.
Best way to deal with it either give all columns generic universal names (Code, Status, Name), or delete the column and recreate it.
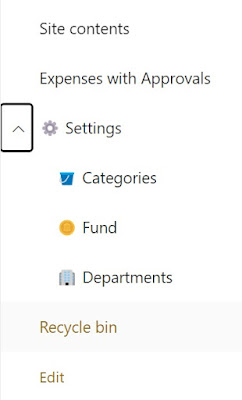
Step 5: Tidy up SharePoint interface / Menu section
+ to add section -> Label-> Cog emoji Settings ⚙️
Drag and drop Categories, Fund and Departments under Settings
Save
Step 6: Add extra columns to our factor table
Date (Date)
Amount ( Number)
Category (Lookup -> Categories List, Name ( or category column depending of how you named it)
Fund (Lookup As above for Fund List)
Department (Lookup as above for Department List)
Watch the video of how to add extra column to bring data from dimension table ( Code from Categories for example)
How to edit Lookup list and reorder
Also in video how to change US date formatting to UK
from mm/dd/yyyy to dd/mm/yyyy.
Common issue for UK SharePoint users.
And you are done! You can test your approval now.
Add lists it to Teams or Embed in SharePoint Page.
This solution is far from perfect! I has its positive sides:
Pros: ✅
Low cost
Easy to set up
Approval Flow
Dynamic Categories / Funds / Departments
Cons: ❌
No split. Categorisation to one Category/Fund/Department combo
Approver has to approve each line rather than a bulk claim
No restriction to approved expenses
Other users can view/edit expenses
I will try to address issues above in future posts, however, it will not be as straight forward as this set up
I will require a bit more work, especially around Power Automate.
Thank you for reading and watching.
IH


Comments
Post a Comment